
This blog is about creating, designing and teaching handmade jewelry in the art mediums of Precious metal clay and polymer clay, in corporating semi-precious gems, freshwater pearls, czs, fine silver and sterling silver.
Thursday, October 9, 2014
Saturday, August 16, 2014
On to Precious Metal Clay Jewelry
Well I've switched to metal clay, freshwater pearls and crystals! I will post photos. Metal clay is one of the most wonderful and exciting mediums I've known. I love the malleable characteristics of the clay. Unlike silver sheet, silver clay is artist friendly, however, the costs are rather high comparable to silver sheet work. The clay is available in bronze, copper, steel, sterling silver and, of course, gold. The two pieces of jewelry I have just designed and completed are two custom pieces and if I might say so, very attractive and winsome. Take a look.


If you would like more information on this jewelry or to schedule a metal clay or polymer clay class
Please email: marilyn@bitsofclay.com
Saturday, July 12, 2014
There Are Still Earrings to Be Created!
 Still creating earrings in polymer clay! I will post them here. It all started as a way to get more items in my Etsy shop and maybe create sales. I am into this earring mode right now and I want to get to a new place and design and create something new and interesting. I hope you like these earrings, though. Here's the earring photos:


Tuesday, July 1, 2014
A Couple of Precious Metal Clay Pendants Popped In
I'm still into earrings, polymer clay, right now. I do create Precious metal clay and Bronze clay earrings, but as of the last few weeks, it's been polymer! Still, as of my last post, I wonder why hoops, usually silver hoops are worn by about 80% of women and girls. I have decided hoops are a "go to pair of earrings" because they go with everything. You can wear them dress up or dress down. They go with any color and pattern of clothing you wear. Hoops are very comfortable to wear and lightweight, as well.
This bears hard on a polymer clay artist, who like color and different shapes. This is somewhat difficult. There is a market for polymer earrings, but it's sometimes hard to find that customer.
I am sometimes asked to create a custom pair for a local customer, but these are few in my world. I just need to research and work harder on this issue. I need to find colors and non-colors AND shapes that appeal. Here are a few images of the polymer earrings:


Here's a couples of Precious metal clay pendants, I managed to work in:


Sunday, June 22, 2014
Earring Styles
What is your favorite earring style to wear? Which earrings are your "go to pair"? What pair do you grab when you're in a hurry or running out the door. If you are like most people that I observe, it is a simple pair of silver metal hoops. Why is that? From familiarity, habit, security, "a go with everything and every situation" average pair. I wonder what makes a girl/woman choose these. Of all the many, many styles to choose from, why do we choose these sometimes boring hoops. No matter the size, they can be, in my humble opinion, mediocre and unimaginative. It would be interesting to take an earring poll to see why we choose these boring hoops! I hope I can raise some interest here as to our choices in earring style. Please, could I have some feedback. Why do you wear hoop earrings?What is your favorite earring style?
Saturday, May 17, 2014
Working With Pardo Trans. and Inks
Still working with Pardo translucent and alcohol inks and enjoying. Thinking of all sorts of possibilities, such as styles, shapes and such. I am trying to create a spiral of color within the translucent. Not there, yet. But don't count me out. I'm pretty persistent!
Here's what I am talking about:

 |
Tuesday, April 15, 2014
Still At It
Well, We're having winter again, Dogwood winter. The temperature went from 84* on Saturday to 37* and snow today, April 15th! Oh well, hang around in East Tennessee and it will change. Meantime, Pardo Translucent has taken over my creative time, still! I need to get a new supply, soon. I am trying new ideas, hollow beads and adding alcohol inks in different ways. One necklace is so hard to photo. It is white with translucent and difficult to capture the image in an attractive way. I will post photos when I get one! I do have a pair of large pink hollow with copper bead cap and copper wires that turned out well. Here's another pink petal necklace with crystals and I have more to come. I love it.


I have developed some hollow beads with a particular technique I haven't seen used before. It may be out there and being used by someone in the polymer clay world. I am going to write a tutorial for it soon as well as one for Pardo translucent beads I make.
Pardo Trans. jewelry blog post
Saturday, April 5, 2014
Makes You Want To Create
At the beginning of spring, I have renewed energy and inspiration to create something. I think it has to do with the renewal of everything in nature beginning to emerge anew.
I think I'm not alone in these feelings. I have been very busy making stuff. Lots of beads and components for jewelry. I have gone from one type of jewelry to another in both polymer and silver metal clay. I don't have a lot completed but will post photos as I do. Pardo translucent clay and alcohol inks have taken my interest and hollow beads run a close second.
Get packing and c r e a t e .


Thursday, March 20, 2014
Working with Metal Clay
Working with metal clay
When I was first introduced to Precious Metal Clay and began working with it, I fell in love with it. It was the answer to my design dreams. The clay is so malleable and easy to shape into unlimited designs.
Beginning with metal clay is very challenging but very simple rules apply. A few tools are needed, some very simple. Clay, I use PMC+ or PMC3 for most projects. Occasionally, for finer detail, I use Original PMC. A piece of tempered glass or ceramic tiles, deck of cards for measuring thickness, pvc roller or similar to roll the clay into a small sheet, thin cutting blade, small textures; (look around your kitchen for lightly engraved textures, plastic textures are available), and olive oil or Badger Balm is what I use.To make a pair of earrings, charm or small pendant:
When working with metal clay, plan ahead and decide your project and have all you will need to use ready at your work space. Open one 7.5 pkg. of PMC, remember the clay dries out very quickly. Use a very small amount Badger balm or olive oil on hands,work surface,roller,texture and blade. on your work surface, with 3-4 playing cards stacked on each side of clay, with the roller ends are on top of the two stacks of cards, roller clay into sheet, cut out two textured earrings, OR two small textured charms with texture OR a small textured pendant. Use toothpick, needle,small straw or needle tool and make holes for attachments later. Make holes larger then you think you will need as the clay will shrink as least 12%. Dry on cup warmer, hot plate or over night. I use brass texture sheets and dry on hot plate. After drying, smooth, sand and make smooth all edges of the pieces and holes. When you are satisfied with your pieces, place on fiber board, place in kiln, which is preprogrammed for these clays. IF you want to torch fire the pieces and they are not more than 1/8" thick, which they will not be, Place on firing brick, have long copper thongs, timer, potholder and filled torch ready. Turn on torch and move in small circle over the pieces until piece becomes orange in color, start timer and torch for three minutes, still moving the short flame in small circles over the pieces. After the timer sounds, do not touch the fired pieces except with tongs or wait until cool. Brass brush and/or tumble in steel shot to clean to a shiny silver finish. IF you want to patina the pieces, use liquid Liver of Sulfur (what I use) or a patina of your choice. Your pieces are ready to attach the findings and wear.


https://www.facebook.com/bitsofclay?ref=hl
Friday, January 31, 2014
Big Learning Curve
My daughter sent a photo of silver wire and freshwater pearl earrings. Having no wire working experience, I thought, "that's looks simple", I think I can make those earrings for her. Well.......let me tell you After wrapping the ends of pliers with masking tape, I began. First, I had to find silver wire thin enough for the freshwater pearls to fit on Ok, I'm ready to start bending the wire . I estimate the length and cut the wires. With my round nose pliers, I began making my spirals.. Found out I couldn't bend both earrings at the same time. I made one spiral, added the pearl, bent down the ear wire. Picked up the other earring and tried to match the spiral of the first earring. Well, that wasn't so simple, but I carried on and they match, if you don't look too close! I finished them off with a bur to smooth the ear wire ends. I hunted up my ball peen hammer and began hammering the spirals. This part, too, is a serious learning curse. The first spiral I hammered to thin and had to cut another wire and bend the spiral and ear wire. Whew! I will add a photo, later. I will need lots and lots of practice!www.bitsofclay.com
Tuesday, December 3, 2013
A Part of You In Hand-created Art
I was thinking today........... as I was working on some custom earrings, how in every piece of jewelry I create, a part of me goes into that jewelry. In your mind you begin to work out the details of that piece. You put a part of your heart into it, because you want to create what your client was thinking and will be pleased with. Your hands work to shape and define the lines and color tones just the way you imagined and that pleases you. So, a part of you has to be in your work and goes out the door with it. It is a satisfaction and pride that swells in your chest in doing your best to be on the same wave length as your client.
That makes me feel proud just thinking about it. I sometimes don't want to let go of some of my pieces. I feel so close to some pieces of jewelry, I just want to keep them. I don't know if other artists feel the same way or not. I'm betting there are other artists out there that feel this way, too.
As you can probably tell by now, I do not like production work. I usually create one-of-a-kind pieces. Sometimes, I will create three or four of the same design! (photos later)
Wednesday, November 6, 2013
Finished Orders
Hello, I am sitting here contemplating where to go next. I have finished my wholesale order and my custom order. I am not complaining---I'd love to have more orders to create. Jewelry is so individual. Jewelry has to be seen to be appreciated and desired. You never know what sparks a purchase by an individual. It has to be seen and even better touched by the buyer, if at all possible. How do you decide this pendant is me or this ring, I just have to have. Or, this bracelet is for my daughter. It's just her taste.
I am very interested in the decisions made when purchasing handmade jewelry. Whether it is an impulse buy or a planned purchase. I like rings so naturally I'm always looking at rings that fit my style.
What piece of jewelry and style of jewelry to you tend to look for or go to. It may be a gift you've been thinking of purchasing for a loved one or for a friend.
If it's a custom piece of jewelry you've been thinking about, just shoot me an email: marilyn@bitsoclay.com
http://www.bitsofclay.com
Thursday, October 10, 2013
Having Fun and Off Schedule
What do you do when fun things and some not so fun can take you off your schedule. Planned my family's picnic, which went very well, by the way. I was asked to create black and white hounds tooth cane and created sample earrings from the cane.

 Prepared clay for a great Kathleen Dustin purse workshop. Here's a couple of photos of my purse. The purse is all polymer, except for the rubber strap. If you get a chance to take a workshop from Kathleen Dustin, you want will thoroughly enjoy it.

Tuesday, September 3, 2013
New Fall Pantone colors
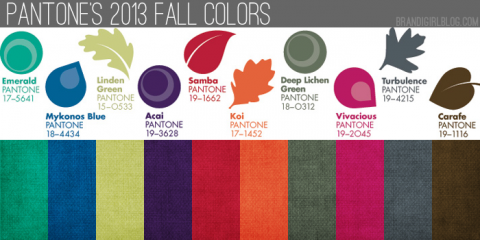
The new Pantone colors
for Fall are out and I love them, expecially the emerald,Mykonos blue and Linden green.
I tend to lean toward these three, but can work in all colors and shades. This palette is compatible to most pleasing skin and hair colors.
Need to create some blends in polymer clay in these choices. More later on these color choices with example images.
Tuesday, August 6, 2013
Sometimes Handmade Jewelry Becomes Work
Designing and creating handmade jewelry is what I like to do, most of the time I'm creating. However, it can become like work to me when I have a deadline and I am behind in my scheduled creations. I always try to keep my word and finish on time when working with a client.
I spread my wings and tried--wholesale. I most often consign, but would love to wholesale more. I am just beginning and hope to do more, if I can.
While I love to design and create, usually one-of-a-kind jewelry, I need an outlet for these designs. Marketing is time consuming and all the time. You are trying to get your product out before people, interested and repeat clients and potential buyers. Actually, marketing should be a full time job for an employee, if you can manage this luxury. If not, you are your own marketing agent. Marketing takes away from your creative time in a big way. You must be well organized and have a schedule to follow in your marketing. I am not the best at scheduling, but am getting more organized as I go along in this journey.


Sunday, June 30, 2013
Adapting Mokume Gane
Mokume Gane a Japanese layered metal technique has been adapted to polymer clay. It is one of my favorite techniques for polymer clay.
Mokume gane is a mixed metal technique used for producing the appearance of wood grain on metal. The name is descriptive. "Moku" means wood, "me" means eye and "gane" translates as metal. A variety of metals can be used in mokume gane, both historically and in modern applications. Mokume can be and has been used to make not only jewelry, but also a variety of other metal items, including weapons. Mokume gane was invented by Denbei Shoami, a 17th century smith from the Akita prefecture. Originally, the process was used to make elaborate and ornamental samurai sword handles and sheaths. Historically, gold, copper and silver were used to create laminated billets. These laminated metal billets were then used to forge, craft and finish the mokume gane items. Read more: http://www.ehow.com/about_5122436_mokume.html#ixzz2XjBPE3Vj
The style of mokume gane that I favor the most is one I learned in Lindly Hunani's class several years ago. It is created from a strip of Skinner blend,(I like to use a medium teal color with a medium tint of cobalt blue for my Skinner blend) cut into eight sections, then combined with a pkg. of translucent, also cut into eight equal sections and mixed individually with one section of the cut Skinner blend. After mixing the eight blends, pass thru the pasta machine from #1 (thick) setting to #6 (thin), trim sheets until six will fit on a sheet of silver metal leaf. Cut apart and stack, using the seventh sheet to top the stack. The eighth sheet will be used to create balls, similar to peas and randomly place on bottom of stack. Shape the stack to make hills where the peas are by pushing up on the peas from the bottom of the stack and make valleys in between. Let rest or chill stack before taking thin slices off of the hills on top. Have a base sheet of clay and place the slices on the sheet, placing the most interesting slices last. Smooth flat with brayer or roller. Cut out for your selected jewelry pieces and bake according to the manufacturer's directions. I usually tent my pieces of jewelry and lower the oven, slightly when translucent is used in jewelry.

Mokume Gane No. 2:
(I call it
distressed Mokume Gane)
In this style of Mokume Gane style we will use four layers
of clay and push tools and textures from the top to the (almost) bottom of stack.
The artists also sometimes use paint and metal leaf between layers of
clay. Today we will stack four colors of
clay sheets and, after compressing and running thru pasta
machine, until we have sixteen layers, we push tools,
textures and wavy blade into our stack, planned or random. Try to arrive at about 2”x3” and about ½” to
¾” high. Stack. Let rest, then take thin slices with a clean
thin blade, flip onto deli sheet, as in first tutorial and follow same
instructions with baking and finishing steps.

No. 3: Mokume Gane
style:
This style uses linoleum cutters or carving tools to create
a design in this style. Let’s begin by stacking
five contrasting colors: white, raw
sienna, gold, Spanish olive green and black (or similar colors). First, we will prepare layers by passing thru
pasta machine, cut into two even stacks, until we arrive at 20 very thin
layers. Try to arrive with a stack 4”x4”
and ¼ “high. Using linoleum or carving
tools, make your design by carving into and removing clay from stack. Pull apart slightly and run thru pasta
machine. You may want to turn 45 degrees
and run back pasta machine. Proceed with
baking and finishing steps in first tutorial, with the exception of taking thin
slices from stack. If you have any questions, please email me at: marilyn@bitsofclay.com

Subscribe to:
Posts (Atom)