Wednesday, June 19, 2013

What is The Difference in Translucent Polymer Clays


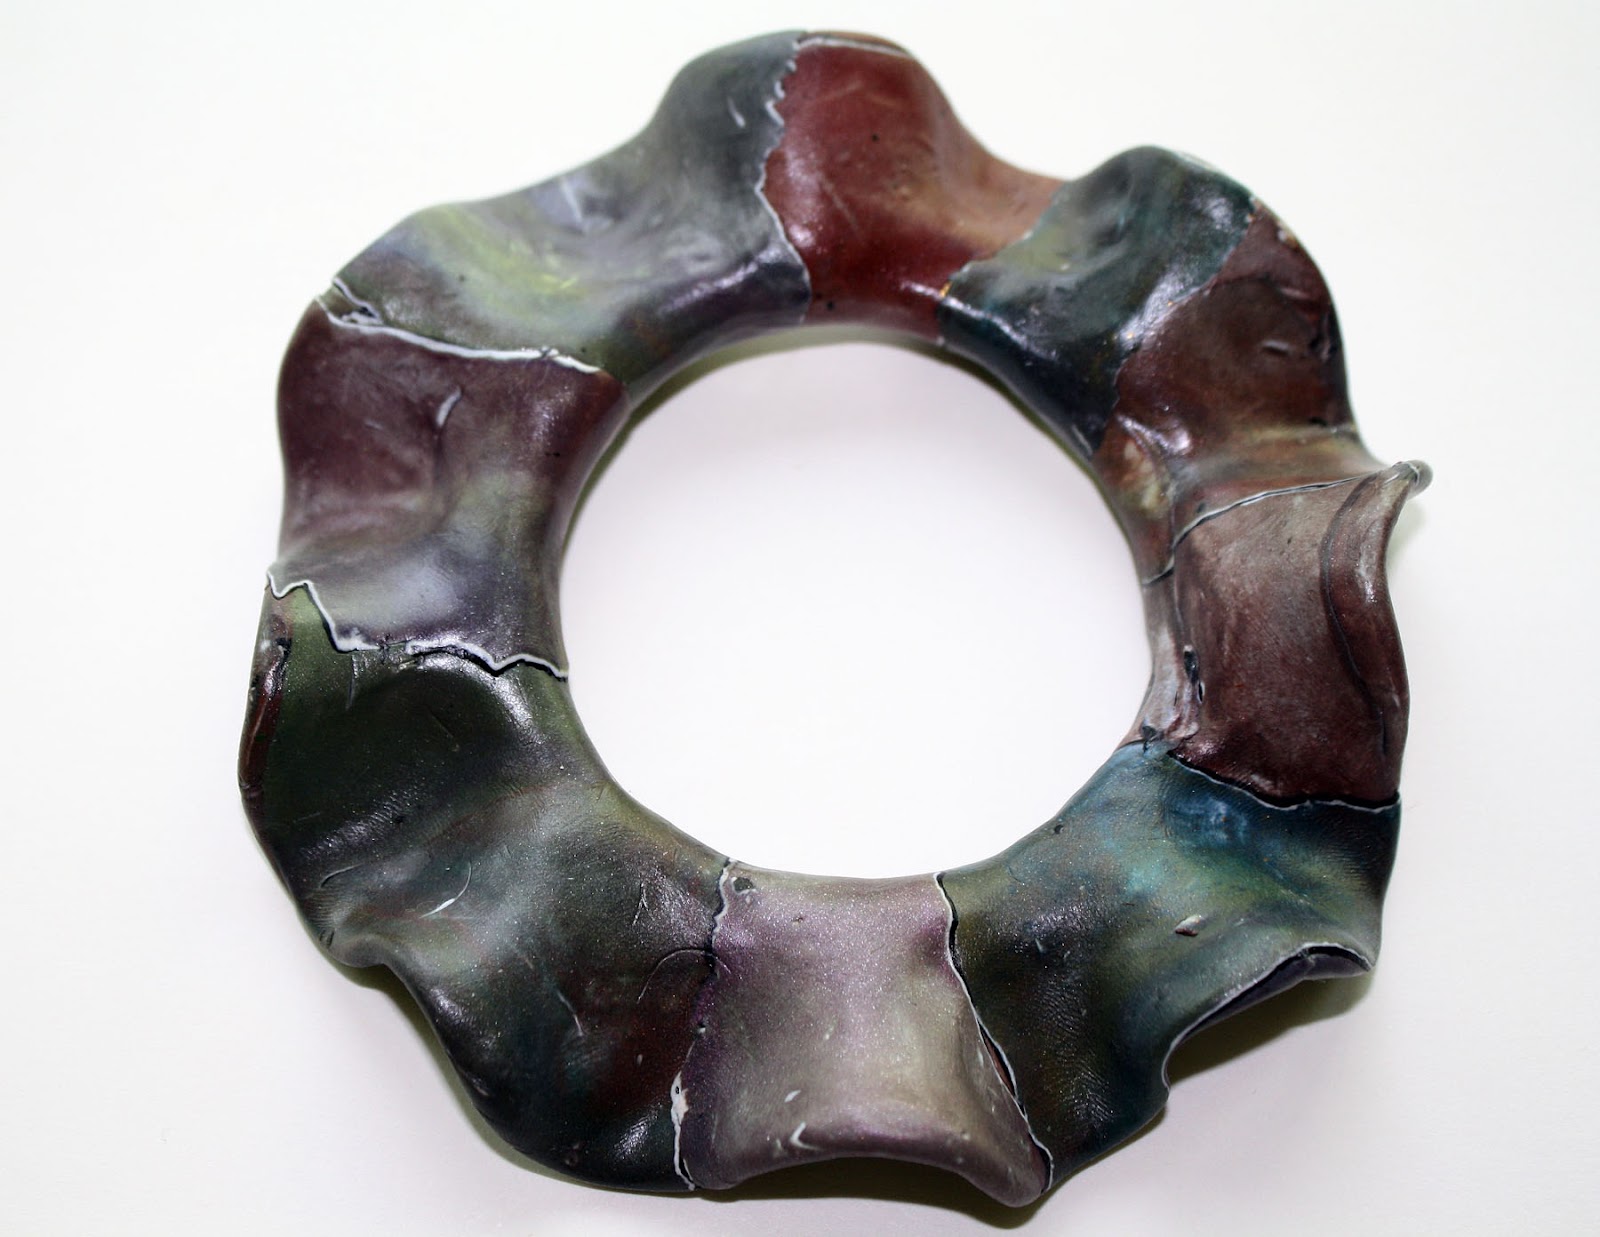
As you may have noticed, I enjoy working in translucent polymer clay.  I have worked with several clay brands and the new Pardo translucent is the clearest and most transparent that I have found.  I use alcohol inks for the color in the hollow beads I create. After mixing in the ink, I form a thin layer on the glass Christmas bulbs, then bake.  With my glasses on and a large set of pliers and gently crush the glass inside the bead into a lined trash can. I'm always looking for different shapes to use for beads.  Then create a  design for the beads into a necklace.  The necklaces are so very light weight and easy to wear.  You'll feel like checking to see if you are still wearing it! 

I was purchasing Pardo clay at Hobby Lobby, but now need to purchase on line.  It is not always easy to get Pardo Translucent.  I am writing a tutorial on creating hollow translucent beads and will  promote soon.


New classes for metal clay and polymer clay
www.bitsofclay.com

Tuesday, May 28, 2013

Trying New Techniques


My friend, Suzanne Ivester, sent a photo image of Watermelon Tourmaline, recently and asked if I might want to try replicating it in Pardo translucent and alcohol inks.  I love to experiment with polymer clay, so I tried creating a faux version, I'm still working with this.   Here's one version:
I will be experimenting with more versions of this beautiful gem. As one of my friends said,   " It reminds me of summer."  I will post more images soon.

Friday, April 26, 2013

Postscript to yesterday post: 


 Another hollow bead necklace.

Wednesday, April 24, 2013

Spring is Such A Lovely Time


Spring is such an wonderful and lovely time of the year.  I don't know anyone who doesn't feel the difference in their lives in the springtime.  It is a fresh beginning, awakening and new growth.  Spring is a busy time, also, with graduations, weddings, picnics and gatherings.   Metal Clay and Polymer Clay workshops are held during springtime, as well as many other mediums and groups. 

I have a few new pieces of jewelry I have photographed and will list here:


The translucent beads are fun to make and I will be glad to share the process I use.   I use Pardo Trans. and a very small amount of alcohol ink.  Mix well, then
take a small amount of the clay mix and form around small glass bulbs.  Bake, tented with aluminum foil and, at a slightly lower temperature for 30 minutes. 
 
When I began working with polymer clay several years ago, I created flowers, leaves and flower canes.  I created hundreds!  Now to use all these flower and leaf canes!  The Flower Garden neckpiece is one of the pieces.  The canes are simple and various techniques for flowers.
 
The watercolor jewelry began from using the watercolor technique, a variation of Maggie Maggio.     http://maggiemaggio.com/color/tutorials/watercolor-technique-tutorial/
  I enjoy working with these mediums and creating handmade jewelry.  Have an awesome day and go create something!

Wednesday, March 27, 2013

New Ideas and Work


For several weeks, I've been working on new pieces and new ideas, trying to go in a different direction.  I have a few pieces almost finished and need to photo them.
I have more watercolor work to finish and today, after taking a workshop with Meisha Barbee from San Diego, California  this past weekend, I've got many ideas for pendants, earrings and brooches swirling around in my head. 

Here's a photo of one of her pieces:
 
 
Her work is usually in the form of a pendant or earrings, but this piece shows her style and technique. 
 
 
Photos are coming.  First finish the pieces!

Friday, February 15, 2013

Watercolor or Torn Paper Technique

  It came up innocently enough at our last guild meeting.    One of our guild members was do a fabulous job demostrating a polymer clay technique called "watercolor"or some call it "torn paper".   Maggie Maggio is the polymer clay artist who, as far as I know came up with this technique.  Other artists are Jeanne Rhea and Judy Kuskin, who use this technique. There are many other artists who have created with this technique, also.  Someone at the meeting suggested a challenge to create something with this technique.  Another member suggested a heart swap for February's meeting.  This is a challenge in it's self.  When the final watercolor sheet is applied to the scrap clay shaped heart, it has to be even and free of hills and valleys and smooth as much as possible.  Sanding is not a part of this technique, as we usually do to create a smooth piece and eleminate small divits or marring.

Watercolor Technique:

In using this technique, you would choose your pallette by begnning with red, yellow and blue.  A very nice selecton of these colors are Magenta, Zinc Yellow and Cobalt Blue. Mix  your palette to primary stage for these hues.  Take small amounts of three of these colors mix and run thru pasta machine until your are pleased with the mix---do not overmix to mud stage.  Run this mix thru pasta machine to (no. 6 on a Atlas Pasta Machine), place a prepared sheet of white (no.1) with color mix until you reach thru (no.6).  Prepare a sheet of  black to a (no.6) and place behind the white sheet and run thru pasta machine back to (no.1) You can add a sheet of metal leaf between the color mix and white, if you choose to add a little sparkle.  All of us polymer clay people have mud mixes--scrap clay--so take scrap clay run thru Pasta Machine on no. 1.  Use a cutter to keep beads the same size and roll and shape your base bead.  Begin tearing selected sections of your watercolor sheet and applying to your bead.  Roll each bead in palms of your hands.  Remember you do not sand these beads, so try to round your beads as smooth as you can.  Decide where you want to make holes or drill after baking the beads.  Bake beads at clay manufacturers instructions.

Wednesday, January 23, 2013

Now Back To My Claying


Most of the Christmas decorations, gift wrapping, boxes, etc are neatly stored and I'm on to my claying projects.  I have three projects or ideas going right now and I want to get my Bronz metal clay out of the refrigerator.  I have been so excited to explore an idea I have for a Faux Needlepoint technique.  One of the reasons this came about was to use some of the many flower canes I have made and have stored in plastic boxes and drawers in my craft room.  I am not succeeding in using the flower canes up!  I began making floral and leaf canes and continued and continued.  Some are ok and some canes are not !  I have improved in this technique over the years, but still have many, many canes.  Here are some images of this project.

  What do you think?  Like the Idea?  I do.  I Like to cut into clay and create different looks and techniques.

Another

Sunday, December 30, 2012

Focusing On The Important Things


    Well, dinner is served, tree and decorations are wrapped and stored away, because I'm sitting at my daughter and son-in-law's cozy home in Myrtle Beach, enjoying every minute of our time together, with part of our family and our granddogs(the other half are in Ca.)  So, no projects to be worked on in either clay.  I have projects to complete and ideas swirling around in my head.  I have started a new metal clay line of inspiration word necklaces and initial necklaces and personal chosen charms.  I completed a couple and gave as  Christmas gifts.  I think they were well received.  I will continue with these after the new year, when I return home.  I am, also, going to finish some mokume gane desk items, promised before the holidays.  I love to create with mokume gane.  Here's a couple of the metal clay jewelry gifts I gave.

Tuesday, December 18, 2012

Occupied With Necessary and Unnecessary Things


One of the most important things for me to remember is work from a list at this time of the year, expecially if you are having about 25 guests for lunch on Christmas day.  During this planning, shopping and baking time, I tend to get off track often.  I am notorious for straying from the chore at hand.  I sometimes get too involved in minute details(ADD) or I might be fighting perfectionism!  I managed to complete a few new pieces of jewelry in metal clay and almost finished with some polymer earrings.  I am during well with my time, since none of my polymer classes made at three different places.  My potential students are busy just like I am or maybe it was the choice of techniques for the classes.  Who knows.  Here are photos of some necklaces I'm creating.

Monday, November 19, 2012

Find YourCustomers


Finding your customer base is one of your goals in your handcrafted jewelry business.  Who do you want to wear and promote your handmade jewelry?  After you have designed and created your designs and they are ready to be in the hands of your customers.  Who are they?  Where are they? How do you connect with them?  This is a task or job to be researched by you for your business.  Go to friends or artists you admire and are successful in the handmade jewerly business.  Join in with groups on line that you are interested in and can offer advice and tips to beginning artists.  Begin blogging about who you are and your jewelry and why you do what you do in your chosen craft.  Try to keep up to date with trends and styles and include some of these into your designs,  Keep revolving your handmade jewelry designs and develop a style of your own.  This will help individualize your lovely designs.

Sunday, October 28, 2012

Kaleidoscope Canes Can Be Fun and Fantastic
Have you ever been in the middle of  a project and started another.  I have and do often.  Bad habit, or am I very versatile, or maybe a little ADHD?    I needed to create a project for a class at White Fox Beads and settled on a kaleidoscope cane in polymer clay.  The cane needed to interesting but not intricate for beginners as well as students who had already worked with polymer clay.  Out comes the drawing pad and start drawing shapes and thinking  how they relate and color choices.  I choice rose and turquoise and created Skinner Blends and wrapped  it w #4  (on your pasta machine)  sheet of turquoise and then in a thin sheet of black clay, lengthened to 8", then cut into two logs each of 4". I wrapped a turquoise log in sheet of  black clay,#5 on your pasta machine.  A simple cane for beginners and interesting enough for students who were already clayers. 
Begin by placing  the two rose colored logs together and pinching the tops into soft edge, then add turquoise log on the bottom and shape into triangle. Lengthen your triangle to 8", cut in the center and reassemble.

Place the two canes like this.


Lengthen cane to 8", cut in center and reassemble.  Now you can put your cane together as I have in the next photo.


.


Two more canes using these Skinner blends with other configurations.


 Here are the three canes I constructed from the Skinner blends.


                                       A photo of the finished jewelry I created from two of the canes.
Hope you enjoy this tutorial.  If you have questions, email me : marilyn@bitsofclay.com                                                                                                                                                  

Tuesday, August 14, 2012

Stripes Into Geometrics (April 2010 PolymerCAFE)

Here's a tutorial that was published in PolymerCAFE some time ago.  I plan to add more tips and tutorials soon.


Tuesday, July 17, 2012

Tutorials

Loving Hollow Beads


I am enamoured by all the hollow beads other artists have been creating in my on line  groups and at my guild(BRPCG).  I ordered  Pardo transparent clay and used alcohol inks to create a variety of coral hollow beads.  I fashioned a very thin sheet around small Christmas bulbs, up to the neck but not covering the neck with clay sheet, after having removed the hanging wire and top cap of the bulbs, then baked in my convection oven for 30 minutes.  After baking I used a large set of pliers and gently pressed all around the bulb  and top of bulb to crack the glass inside and removed the glass pieces into a small trash can by shaking out the glass( you will have an opening about 1/2 inch in diameter in which to shake out the glass pieces).  Wear glasses and be extremely careful when removing the remaining glass pieces that will not readily come out of the hollow bead.  On one necklace I used brass chain, large brass bead caps to cover openings and head pins, cut to size and looped to attach to chain section.  The necklace is very light weight and easy to wear.  I also created earrings  and filler beads to use to complement the necklace.  I have more hollow beads ready to create another necklace fashioned in various tints of my favorite teal color.  I have included a photo of the coral necklace.  If there are questions regarding the technique, I will be happy to answer them at:  marilyn@bitsofclay.com


Saturday, June 23, 2012

Talking About Custom Jewelry


What are the appropriate questions and information needed for creating a pleasing custom piece of jewelry for someone?   Recently, I was asked by a friend of my daughter's to create a metal clay pendant for a ten year anniversary for the founder of a club.  Since I did not know or had not seen the founder,  I asked the event coordinator of the club several questions about the founder, such as, what type of jewelry she wears.  What type of personality does she have.  Does she dress conservative, classic, hip, or more flamboyant.  This information helps me fit the jewelry piece to the person because I want her to be pleased and accepting of the pendant. It evens helps me decide what type of chain to use with it.  I found that she was very classic and conservative, so I created a mold from an antique button and then created the pendant, using Precious Metal Clay III and adding a "10" in the center of it. The chain I used was an 18 inch sterling silver snake chain.  I inserted some images of the pendant below.  By the way, the founder was very pleased with her jewelry!


Wednesday, May 30, 2012

Dragonflies Have Flown Off


Well.......the dragonflies that I have been working on for a custom order have flown off, along with a custom metal clay pendant. The hardest issue I had with the dragonflies is keeping the wings securely attached to their bodies. I inserted wire for support but polymer clay and wire do not adhere to each other without super glue gel! Some had to be reglued and liquid polymer clay added to wings and body of dragonflies. I created the cells of the wings with transparent and silver clay. Molded the wings and added blue-green interference powders (Perfect Pearls) and a little silver powder to the bodies of the dragonflies. Hopefully, in transport, the wings will stay securely attached. Lastly, I added the floral wire cut to twelve inches, and super glued the wires into the underside of the dragonflies. More than twenty flew off.
.